Fluffy Pita Bread Recipe
There’s a unique satisfaction that comes from baking your own bread, a simple act that fills the kitchen with an incomparable aroma. But nothing quite matches the magic of watching a humble disc of dough puff up into a perfect, steamy pillow in a hot oven. That moment is what makes homemade pita bread so special. It transforms a basic flatbread into something spectacular – a soft, warm, pocket-ready vessel for all sorts of delicious fillings. I used to be quite intimidated by yeast doughs, but this straightforward pita bread recipe is the one that truly built my confidence years ago.
Forget the dry, brittle pitas you find in plastic bags at the supermarket. When you make your own, you’re rewarded with a bread that is wonderfully soft, pliable, and full of a subtle, wheaty flavour that shop-bought versions just can’t replicate. The process is deeply rewarding, connecting you to a tradition that’s thousands of years old. The steam-filled pocket that forms inside is practically begging to be filled with grilled meats, crisp salads, or a generous scoop of hummus.
This homemade bread recipe is ideal for a weekend baking project or for when you want to elevate a simple midweek meal. It’s a fantastic recipe for anyone wanting to get more comfortable with bread making, and the results are so impressive that it always gets compliments from family and friends. We love making a big batch to serve with a mezze-style spread on a lazy Sunday afternoon.
Recipe Overview
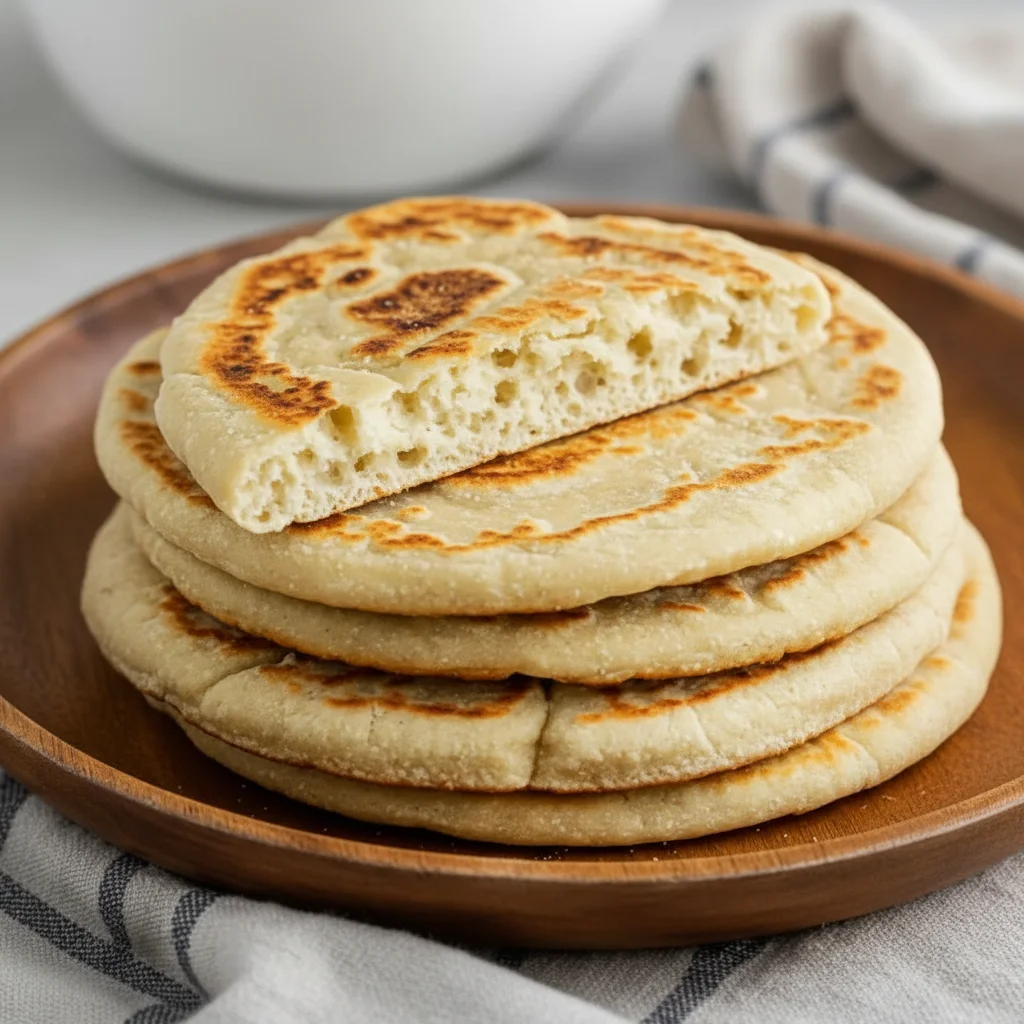
This recipe guides you through creating exceptionally soft and fluffy pita bread that reliably puffs up to create that all-important pocket. The flavour is clean and slightly nutty from the bread flour, with a delicate chewiness. I’ve found that the secret to a consistent puff is an extremely hot baking surface, which we’ll achieve by preheating a heavy baking tray or stone.
- Prep Time: 20 minutes
- Proofing Time: 1 hour 30 minutes
- Cook Time: 15-20 minutes
- Total Time: 2 hours 10 minutes
- Servings: 8 pitas
- Difficulty: Medium
Why You’ll Love This Pita Bread
- Authentic Texture and Flavour: This recipe yields a pita with a wonderfully soft, slightly chewy crumb and a flavour far superior to anything from a packet. It’s the real deal.
- Impressive Results: There’s nothing like serving warm, puffy bread you’ve made yourself. It turns a simple meal into something truly memorable.
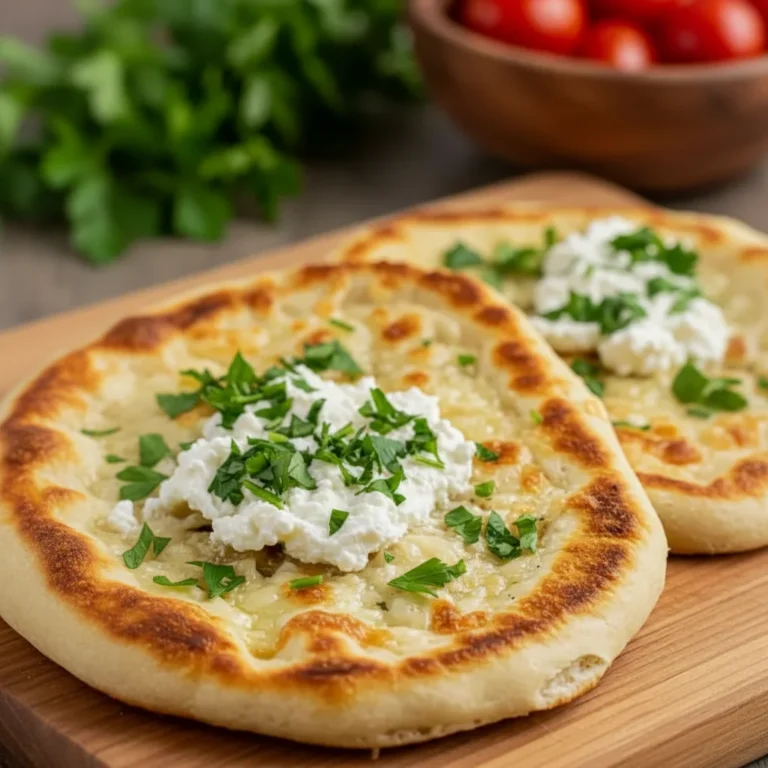
- A Versatile Bread: This flatbread can be used in so many ways. Slice it for dipping, stuff it for a sandwich, or even use it as a base for a mini pizza.
- Works Brilliantly for Gatherings: Ideal for serving alongside grilled meats at a barbecue or as part of a large spread of dips and salads when friends come over.
- Family Tested: I’ve been making this for over 8 years, and it never disappoints. My kids love watching them puff up through the oven door – it’s like a little science experiment.
Ingredients You’ll Need
The ingredients for this pita bread are simple pantry staples. For the best texture and chew, I highly recommend using a strong white bread flour, like one from Allinson or Hovis, as its higher protein content develops a stronger gluten network. It makes a noticeable difference.
- 500g strong white bread flour, plus extra for dusting
- 7g (1 sachet) fast-action dried yeast
- 2 tsp caster sugar
- 1 ½ tsp fine sea salt
- 2 tbsp olive oil, plus a little extra for greasing
- 300ml warm water (about 40°C, comfortable to the touch)
Marcus’s Tip: Ensure your water is warm, not hot. If it’s too hot, it can kill the yeast, and your dough won’t rise. A good test is to dip your finger in – it should feel like a pleasant, warm bath.
How to Make Pita Bread
The process involves a few stages of resting, which is crucial for developing flavour and making the dough easy to work with. Don’t rush these steps; they are key to achieving that perfect fluffy pita.
- Activate the Yeast: In a small bowl or jug, combine the 300ml of warm water, 7g of yeast, and 2 tsp of sugar. Give it a gentle stir and leave it to stand for 5-10 minutes. It should become frothy and bubbly on top, which tells you the yeast is active.
- Mix the Dough: In the bowl of a stand mixer fitted with a dough hook (or a large mixing bowl), whisk together the 500g of bread flour and 1 ½ tsp of salt. Create a well in the centre and pour in the activated yeast mixture and the 2 tbsp of olive oil.
- Knead the Dough: Mix on a low speed until a shaggy dough forms. Then, increase the speed to medium and knead for 6-8 minutes, until the dough is smooth, elastic, and pulls away from the sides of the bowl. If kneading by hand, tip the dough onto a lightly floured surface and knead for about 10 minutes until it passes the windowpane test. I find using the heel of my hand to push and stretch the dough is the most effective method.
- First Proof: Lightly grease a clean bowl with olive oil. Form the dough into a ball and place it in the bowl, turning it once to coat. Cover the bowl with a clean tea towel or cling film and leave it in a warm, draught-free place for 60-90 minutes, or until it has doubled in size.
- Shape the Pitas: Gently punch down the risen dough to release the air. Tip it onto a lightly floured surface and divide it into 8 equal pieces (a kitchen scale is great for this). Roll each piece into a smooth ball and place them on the work surface. Cover with a tea towel and let them rest for 10 minutes. This relaxes the gluten, making them easier to roll out.
- Preheat the Oven: This is a critical step. Place a heavy baking tray (turned upside down), a pizza stone, or a baking steel on the middle rack of your oven. Preheat the oven to its highest setting, typically 240°C (220°C fan). Let the baking surface get searingly hot for at least 30 minutes.
- Roll Out the Dough: Working with one ball of dough at a time, use a rolling pin to roll it into a circle about 15-18cm in diameter and around 5mm thick. Try to keep the thickness even to ensure a good puff. Keep the other dough balls covered as you work.
- Bake the Pitas: Carefully open the oven door and place 2-3 pitas directly onto the hot baking surface. Bake for 2-3 minutes. You should see them puff up dramatically. Use tongs to flip them over and bake for another 1 minute. They should be pale with a few light golden spots. Don’t overbake, or they will become crisp.
- Keep them Soft: Immediately remove the baked pitas from the oven and wrap them in a clean tea towel. This traps the steam and keeps them soft and pliable. Repeat with the remaining dough.
Tips From My Kitchen
- Searing Heat is Essential: The sudden, intense heat from the preheated baking surface is what instantly turns the moisture in the dough into steam, causing the pita to puff up. Don’t skip the preheating step!
- The Secret Step: Don’t press down on the pitas after they come out of the oven. I learned that letting them cool wrapped in a towel allows the steam to redistribute, making the bread soft and preventing the pocket from collapsing completely.
- Make-Ahead: The dough can be made and kept in the fridge after its first proof for up to 24 hours. Just let it come to room temperature for 30-40 minutes before dividing and shaping.
- Storage: Store the cooled pitas in an airtight bag or container at room temperature for up to 3 days. They can be refreshed by spritzing with a little water and warming in a toaster or oven.
Equipment You’ll Need
- Stand mixer with dough hook (optional, but helpful)
- Large mixing bowl
- Heavy-duty baking tray, pizza stone, or baking steel
- Rolling pin
- Kitchen scales
- Clean tea towels
Common Mistakes to Avoid
- Uneven Rolling: If your pita is thicker in some spots and thinner in others, it may not puff evenly. Aim for a consistent thickness of about 5mm all around.
- Not a Hot Enough Oven: A lukewarm oven won’t create the burst of steam needed for the pocket to form. Make sure your oven and your baking surface are fully preheated to at least 230°C.
- Skipping the Rest Times: The rests are not just for the yeast to work. Resting the dough balls after dividing relaxes the gluten, which prevents the dough from springing back when you try to roll it out.
Delicious Variations to Try
Once you’ve mastered the basic homemade bread recipe, it’s fun to experiment with different flavours. Here are a few ideas we enjoy.
- Wholemeal Pita: Replace up to half of the strong white bread flour with wholemeal bread flour for a nuttier flavour and more fibre. You may need to add an extra tablespoon or two of water.
- Herb and Garlic: Add 1 tsp of dried oregano and 2 finely minced garlic cloves to the dry ingredients for a Mediterranean-inspired flavour that works beautifully with grilled chicken or lamb.
- Spiced Version: For a warming, aromatic bread, add 1 tsp of ground cumin and ½ tsp of smoked paprika to the flour. This version is fantastic with our Beef Birria Tacos Recipe filling.
What to Serve With Pita Bread
Freshly baked pitas are incredibly versatile and are the perfect companion to so many dishes. They are so much more than just a sandwich bread.
- Dips and Spreads: The classic pairing. Serve warm pitas with hummus, baba ghanoush, or a tangy tzatziki. Their softness is ideal for scooping.
- Grilled Meats: Stuff the pockets with chicken souvlaki, lamb koftas, or falafel for a complete meal. Add a simple tomato and cucumber salad for freshness. I often make these when I’m grilling for my Smashed Burgers Recipe and use them as buns.
- Soups and Stews: Use the fluffy pita to mop up the last bits of a hearty lentil soup or a rich, flavourful tagine.
Frequently Asked Questions
Pita Bread
Ingredients
Method
- Activate the Yeast: In a small bowl or jug, combine the 300ml of warm water, 7g of yeast, and 2 tsp of sugar. Give it a gentle stir and leave it to stand for 5-10 minutes. It should become frothy and bubbly on top, which tells you the yeast is active.
- Mix the Dough: In the bowl of a stand mixer fitted with a dough hook (or a large mixing bowl), whisk together the 500g of bread flour and 1 ½ tsp of salt. Create a well in the centre and pour in the activated yeast mixture and the 2 tbsp of olive oil.
- Knead the Dough: Mix on a low speed until a shaggy dough forms. Then, increase the speed to medium and knead for 6-8 minutes, until the dough is smooth, elastic, and pulls away from the sides of the bowl. If kneading by hand, tip the dough onto a lightly floured surface and knead for about 10 minutes until it passes the windowpane test. I find using the heel of my hand to push and stretch the dough is the most effective method.
- First Proof: Lightly grease a clean bowl with olive oil. Form the dough into a ball and place it in the bowl, turning it once to coat. Cover the bowl with a clean tea towel or cling film and leave it in a warm, draught-free place for 60-90 minutes, or until it has doubled in size.
- Shape the Pitas: Gently punch down the risen dough to release the air. Tip it onto a lightly floured surface and divide it into 8 equal pieces (a kitchen scale is great for this). Roll each piece into a smooth ball and place them on the work surface. Cover with a tea towel and let them rest for 10 minutes. This relaxes the gluten, making them easier to roll out.
- Preheat the Oven: This is a critical step. Place a heavy baking tray (turned upside down), a pizza stone, or a baking steel on the middle rack of your oven. Preheat the oven to its highest setting, typically 240°C (220°C fan). Let the baking surface get searingly hot for at least 30 minutes.
- Roll Out the Dough: Working with one ball of dough at a time, use a rolling pin to roll it into a circle about 15-18cm in diameter and around 5mm thick. Try to keep the thickness even to ensure a good puff. Keep the other dough balls covered as you work.
- Bake the Pitas: Carefully open the oven door and place 2-3 pitas directly onto the hot baking surface. Bake for 2-3 minutes. You should see them puff up dramatically. Use tongs to flip them over and bake for another 1 minute. They should be pale with a few light golden spots. Don't overbake, or they will become crisp.
- Keep them Soft: Immediately remove the baked pitas from the oven and wrap them in a clean tea towel. This traps the steam and keeps them soft and pliable. Repeat with the remaining dough.
Notes
There is something truly special about tearing open a warm, steamy pita that you’ve made from scratch. It’s a simple pleasure that makes any meal feel a little more wholesome. I do hope you give this homemade pita bread recipe a try; it’s a staple in our house for a very good reason. Let me know how you get on in the comments below – I’d love to hear about your baking adventures!
Happy baking,
Marcus Bennett