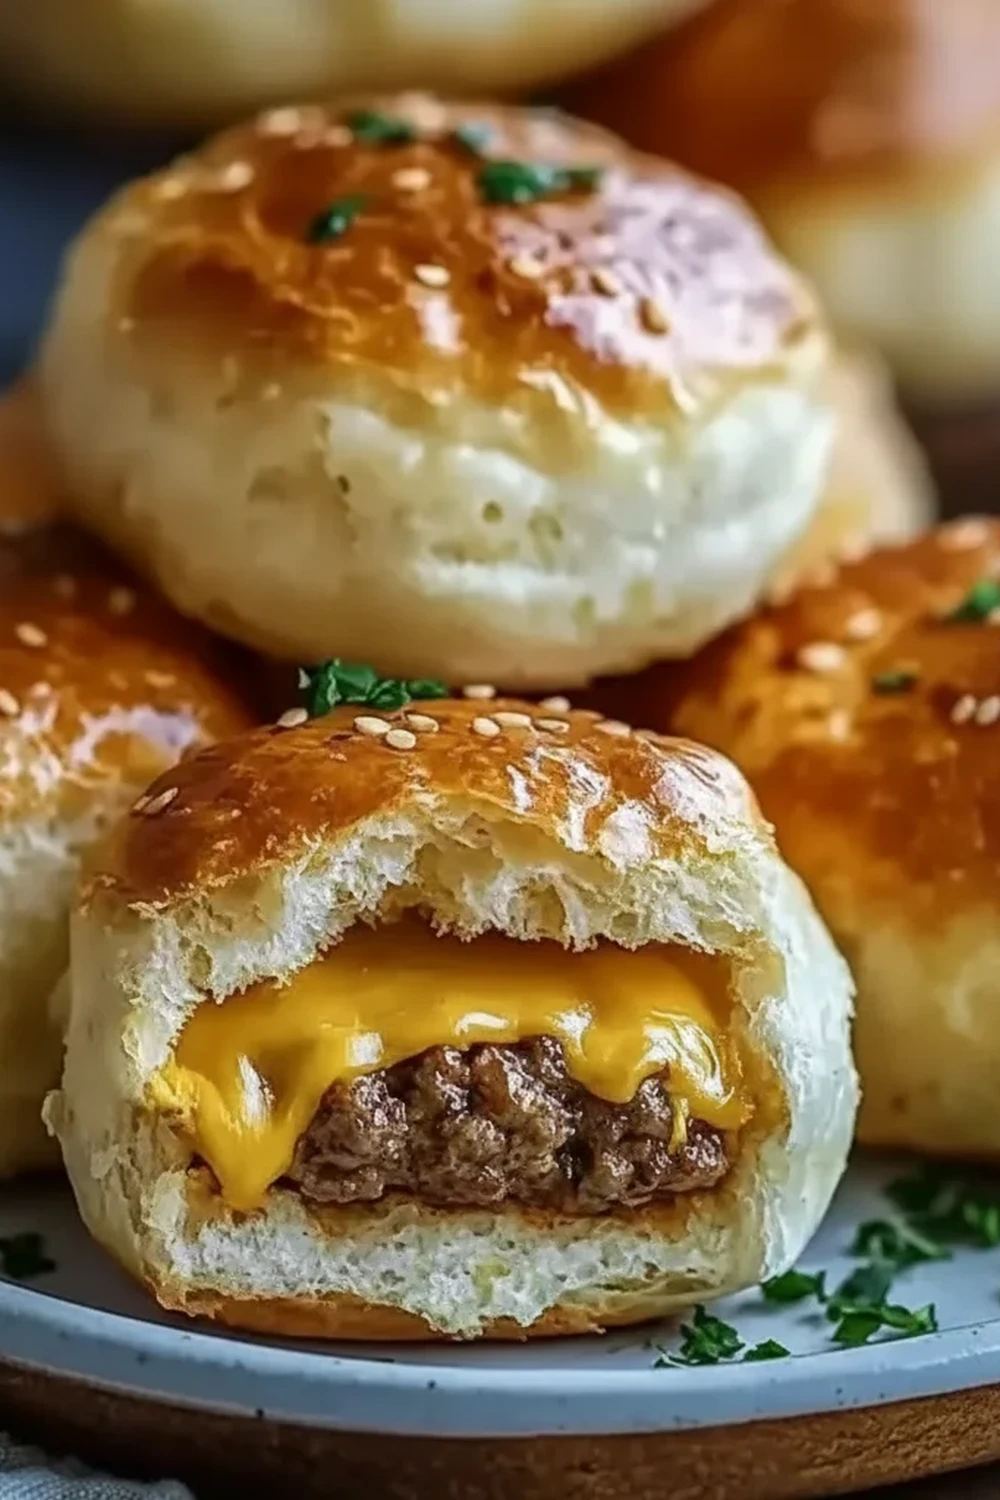
Garlic Parmesan Cheeseburger Bombs

There are some recipes that just make you smile, and these Garlic Parmesan Cheeseburger Bombs are definitely one of them. Imagine a golden, fluffy dough ball, brushed with a savoury garlic and parmesan butter, that gives way to a core of perfectly seasoned minced beef and gloriously melty cheddar cheese. It’s the essence of a great cheeseburger, all wrapped up in a convenient, handheld bite. Friends always ask me for this recipe after trying it at dinner parties, and I’m finally sharing all my secrets to getting them just right.
We’re talking about more than just a simple appetizer here; these burger bites are an experience. The process of making them is straightforward, and the result is something that feels both comforting and a little bit special. They work wonderfully for a casual Friday night dinner with a side salad, as a star attraction on a party buffet, or as a brilliant snack for watching the match. The key is in the details: properly browning the beef, using a good sharp cheddar, and that final, irresistible brush of garlic parmesan butter that crisps up in the oven.
These cheeseburger bombs are a fantastic way to get the family involved in the kitchen, too. The kids can help mix the filling or even have a go at sealing the dough balls (with a bit of supervision, of course). It’s a recipe that’s built for sharing and making memories, and I’m thrilled to walk you through how we make them in my kitchen.
Recipe Overview
These Garlic Parmesan Cheeseburger Bombs are essentially miniature cheeseburgers baked inside a soft dough casing. The filling is a savoury mix of browned minced beef, onions, and melted cheese, seasoned to mimic that classic burger flavour. The dough bakes up fluffy and golden, and a final brush with a garlic-parmesan butter before baking gives it a wonderfully crisp and flavourful crust. After testing this recipe five times, I finally got the biscuit dough to filling ratio just right, ensuring every bite is perfectly balanced.
- Prep Time: 20 minutes
- Cook Time: 15-18 minutes
- Total Time: 35-38 minutes
- Servings: Makes 8 bombs (serves 4)
- Difficulty: Easy
Why You’ll Love This Garlic Parmesan Cheeseburger Bombs Recipe
- Genuine Flavour: The combination of seasoned minced beef, sharp, tangy cheddar, and the rich, umami hit from the Worcestershire sauce tastes just like a classic homemade burger. The garlic parmesan topping adds another layer of savoury depth that takes it over the top.
- Ready in Under 40 Minutes: From browning the mince to pulling these golden beauties out of the oven, the whole process comes together in about 35 minutes, making it a brilliant option for a weeknight treat.
- Flexible Recipe: You can easily tweak the filling. Add some finely chopped bacon for a smoky flavour, a dash of hot sauce for a bit of a kick, or even swap the cheddar for Monterey Jack or Red Leicester.
- Great for Gatherings: These are ideal for serving at a party or a family get-together. They are easy to eat with your hands, require minimal fuss, and everyone seems to love them. They disappear from the plate in minutes!
- Family Tested: My whole family adores these, from my teenage son who could eat the entire batch himself, to my wife who loves them with a crisp green salad for a lighter meal. It’s a recipe that genuinely works for everyone.
Ingredients You’ll Need
For this recipe, we rely on a few quality staples. Using a good 15-20% fat minced beef gives the best flavour and ensures the filling isn’t dry. I always opt for a block of mature cheddar, like a good British one, and grate it myself; it melts so much better than the pre-grated stuff.
- For the Filling:
- 1 tbsp olive oil
- 1 small onion, finely diced
- 2 cloves garlic, minced
- 400g lean minced beef
- 1 tbsp Worcestershire sauce
- 2 tbsp tomato ketchup
- 1 tsp English mustard
- 1/2 tsp salt
- 1/4 tsp black pepper
- 100g mature cheddar cheese, grated
- For the Dough & Topping:
- 1 tube of ready-to-bake refrigerated biscuit or scone dough (approx. 240g, yielding 8 pieces)
- 50g salted butter, melted
- 1 tsp garlic powder
- 30g Parmesan cheese, finely grated
- 1 tbsp fresh parsley, finely chopped (or 1 tsp dried)
Marcus’s Tip: Don’t be tempted to use a very lean minced beef (like 5% fat). The slightly higher fat content is crucial for a juicy, flavourful filling. Just be sure to drain off the excess fat after browning to prevent the dough from becoming greasy.
How to Make Garlic Parmesan Cheeseburger Bombs
The process is quite straightforward. We’ll start by making our flavourful cheeseburger filling, then wrap it snugly in dough before baking it to golden perfection. Pay close attention to sealing the dough; it’s the key to keeping all that cheesy goodness inside.
- Preheat and Prepare: First things first, preheat your oven to 180°C (160°C fan). Line a baking tray with baking parchment to prevent any sticking.
- Sauté the Aromatics: Heat the olive oil in a large frying pan over a medium heat. Add the finely diced onion and cook for 4-5 minutes until it has softened and become translucent. Add the minced garlic and cook for another minute until fragrant.
- Brown the Beef: Add the minced beef to the pan. Break it up with a wooden spoon and cook for 6-8 minutes, until it’s browned all over and no pink remains. For food safety, ensure the mince is cooked through. You can find more information on cooking mince safely from the Food Standards Agency.
- Drain and Season: Carefully drain off any excess fat from the pan. Return the pan to a low heat and stir in the Worcestershire sauce, tomato ketchup, English mustard, salt, and pepper. Mix everything together well and cook for 2 minutes to let the flavours meld. Remove from the heat and allow the mixture to cool for about 5-10 minutes. Once cooled slightly, stir in the grated cheddar cheese.
- Prepare the Dough: While the filling cools, unroll your tube of biscuit dough and separate it into 8 individual pieces. Gently flatten each piece with your hands into a small circle, about 10cm (4 inches) in diameter. What works best for me is to press from the centre outwards, keeping the edges slightly thinner.
- Fill and Seal: Spoon about 2 tablespoons of the beef mixture into the centre of each dough circle. Be careful not to overfill. Bring the edges of the dough up and over the filling, pinching them together firmly at the top to create a sealed ball. Roll it gently between your palms to smooth the seam. Place the bombs seam-side down on your prepared baking tray.
- Prepare the Topping: In a small bowl, mix together the melted butter, garlic powder, and finely grated Parmesan cheese.
- Brush and Bake: Generously brush the garlic parmesan butter mixture over the top and sides of each cheeseburger bomb. Bake in the preheated oven for 15-18 minutes, or until they are a deep golden brown and the dough is cooked through.
- Garnish and Serve: Once out of the oven, sprinkle with the freshly chopped parsley. Let them cool for a few minutes before serving, as the filling will be extremely hot.
Tips From My Kitchen
- Temperature Control: Keep your refrigerated dough cold until you’re ready to use it. Warm dough can be sticky and much harder to work with, making it difficult to get a good seal on your burger bites.
- The Secret Step: Let the meat filling cool down before you add the cheese and stuff the dough. If the filling is too hot, it will start to melt the cheese prematurely and can make the dough weak and prone to tearing.
- Make-Ahead: You can prepare the cheeseburger filling up to 2 days in advance and store it in an airtight container in the fridge. This makes assembly much quicker when you’re ready to bake.
- Storage: Leftover cheeseburger bombs can be stored in an airtight container in the refrigerator for up to 3 days. Reheat them in the oven at 160°C for about 10 minutes or in an air fryer for 3-4 minutes to restore their crispness.
Equipment You’ll Need
- Large frying pan
- Sharp knife and cutting board
- Mixing bowls (one for the filling, one for the topping)
- Baking tray
- Pastry brush
- Wooden spoon or spatula
Common Mistakes to Avoid
- Overfilling the Bombs: It’s tempting to pack as much filling in as possible, but this is the main reason they burst open while baking. Stick to about 2 tablespoons per bomb and ensure you can pull the dough fully around it.
- Not Sealing Properly: Take an extra moment to firmly pinch the seams of the dough together. If there are any gaps, the glorious melted cheese will escape onto your baking tray instead of staying inside.
- Forgetting to Drain the Fat: This step is vital. Excess fat from the minced beef will be absorbed by the dough, resulting in a greasy, soggy bottom. Take the time to drain it properly for the best texture.
Delicious Variations to Try
One of the best things about this recipe is how easily you can adapt it. Here are a few variations we’ve tried and loved at home:
- Spicy Kick: Add 1/2 a teaspoon of chilli flakes or a finely diced jalapeño to the onion and garlic mixture for a welcome bit of heat. A spicy cheese like Pepper Jack also works brilliantly.
- Bacon Cheeseburger Bombs: Add 3-4 rashers of finely chopped, cooked streaky bacon to the beef filling. The smoky, salty flavour is a natural fit.
- Turkey or Chicken Mince: For a lighter alternative, you can substitute the beef with turkey or chicken mince. Just be sure to season it well, as it’s a leaner meat. This is a great swap if you’re making other ground meat recipes like our Stuffed Bell Peppers With Turkey.
–
What to Serve With Garlic Parmesan Cheeseburger Bombs
While these are fantastic on their own, a few simple sides can turn them into a complete meal. For a fun, dip-able experience, I love serving them with a simple burger sauce.
- Burger Sauce Dip: A simple mix of mayonnaise, ketchup, a little mustard, and some finely diced gherkin makes the perfect dipping sauce that enhances the cheeseburger theme.
- A Crisp Green Salad: A simple salad with a sharp vinaigrette dressing helps cut through the richness of the cheeseburger bombs, providing a fresh and balanced contrast.
- Beer Pairing: A cold lager or a pale ale complements the savoury, cheesy flavours beautifully. For a non-alcoholic option, a classic cola works just as well.
Frequently Asked Questions
Garlic Parmesan Cheeseburger Bombs
Ingredients
Method
- Preheat and Prepare: First things first, preheat your oven to 180°C (160°C fan). Line a baking tray with baking parchment to prevent any sticking.
- Sauté the Aromatics: Heat the olive oil in a large frying pan over a medium heat. Add the finely diced onion and cook for 4-5 minutes until it has softened and become translucent. Add the minced garlic and cook for another minute until fragrant.
- Brown the Beef: Add the minced beef to the pan. Break it up with a wooden spoon and cook for 6-8 minutes, until it's browned all over and no pink remains. For food safety, ensure the mince is cooked through. You can find more information on cooking mince safely from the Food Standards Agency.
- Drain and Season: Carefully drain off any excess fat from the pan. Return the pan to a low heat and stir in the Worcestershire sauce, tomato ketchup, English mustard, salt, and pepper. Mix everything together well and cook for 2 minutes to let the flavours meld. Remove from the heat and allow the mixture to cool for about 5-10 minutes. Once cooled slightly, stir in the grated cheddar cheese.
- Prepare the Dough: While the filling cools, unroll your tube of biscuit dough and separate it into 8 individual pieces. Gently flatten each piece with your hands into a small circle, about 10cm (4 inches) in diameter. What works best for me is to press from the centre outwards, keeping the edges slightly thinner.
- Fill and Seal: Spoon about 2 tablespoons of the beef mixture into the centre of each dough circle. Be careful not to overfill. Bring the edges of the dough up and over the filling, pinching them together firmly at the top to create a sealed ball. Roll it gently between your palms to smooth the seam. Place the bombs seam-side down on your prepared baking tray.
- Prepare the Topping: In a small bowl, mix together the melted butter, garlic powder, and finely grated Parmesan cheese.
- Brush and Bake: Generously brush the garlic parmesan butter mixture over the top and sides of each cheeseburger bomb. Bake in the preheated oven for 15-18 minutes, or until they are a deep golden brown and the dough is cooked through.
- Garnish and Serve: Once out of the oven, sprinkle with the freshly chopped parsley. Let them cool for a few minutes before serving, as the filling will be extremely hot.
Notes
I really hope you give these Garlic Parmesan Cheeseburger Bombs a try. They are such a fun and satisfying recipe to make, and the pay-off in flavour is absolutely worth it. If you’re a fan of a good burger, I think you’ll love this unique twist – it has all the elements of our favourite Smashed Burgers Recipe With Crispy Edges in a new format. Let me know how you get on in the comments below – I’d love to hear about it!
– Marcus Bennett