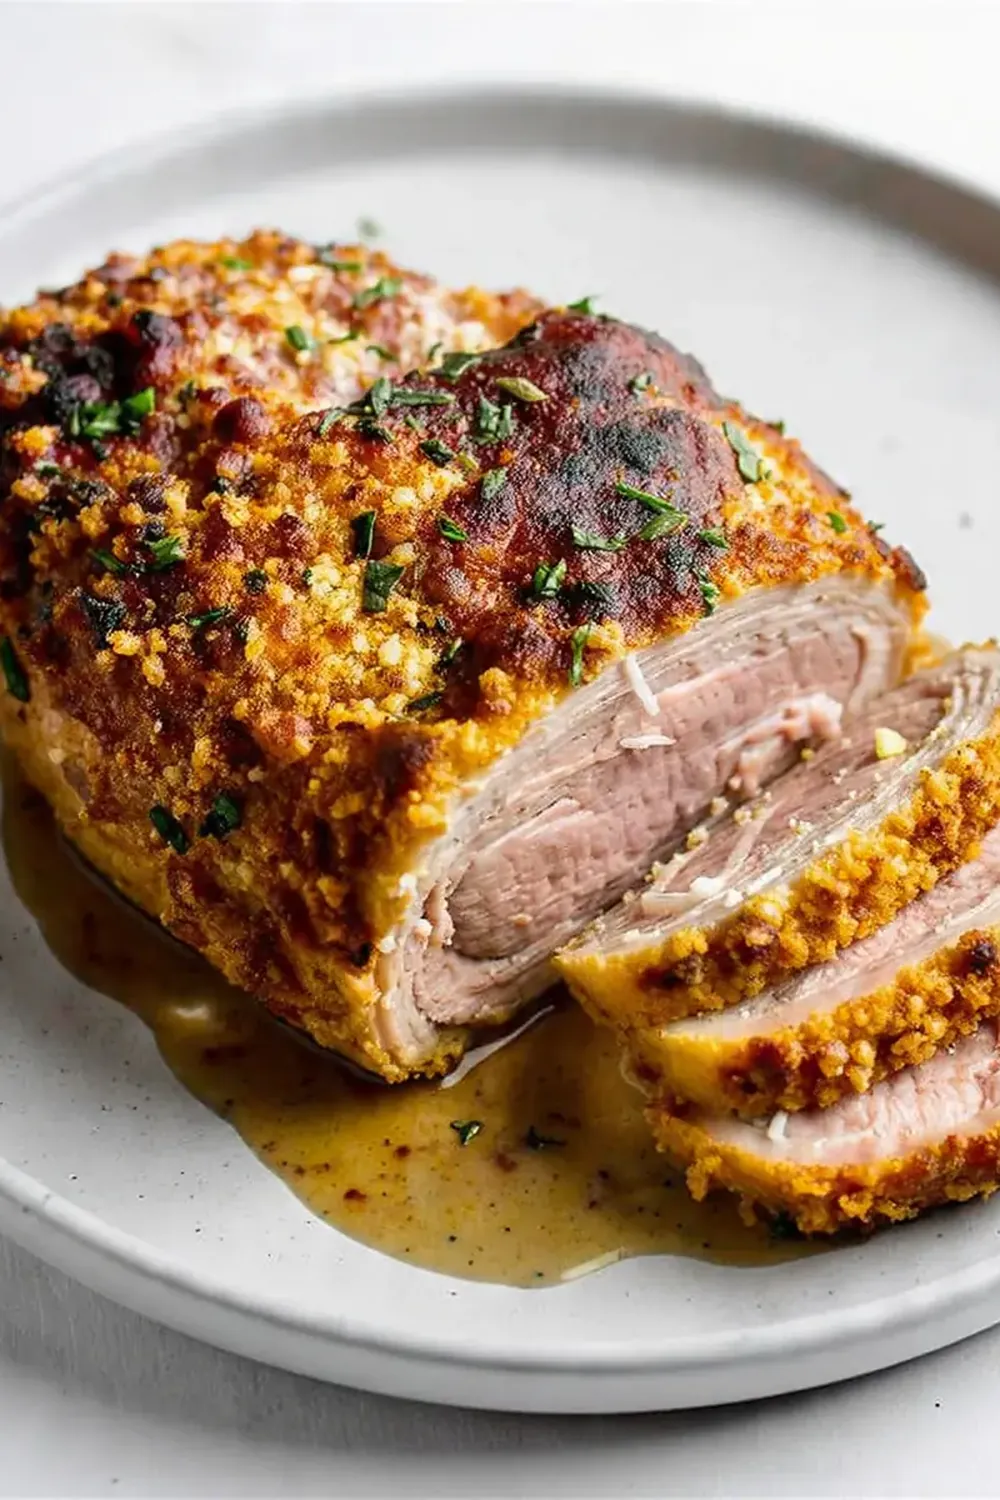
Crispy Baked Pork Tenderloin With Garlic Herb Crust

There are few things more satisfying than pulling a perfectly cooked pork tenderloin from the oven, its surface a glorious, golden-brown shield of fragrant herbs and garlic. I make this at least once a week – it’s become a family favourite, a reliable midweek hero that feels special enough for a Sunday dinner. The trick is in the crust: a generous coating that crisps up beautifully while the meat inside stays tender and juicy. Let’s get started.
Recipe Overview
- Prep Time: 15 minutes
- Cook Time: 25-30 minutes
- Total Time: 45 minutes (plus 10 minutes resting)
- Servings: 4-6 people
- Difficulty: Easy
Why You’ll Love This Crispy Baked Pork Tenderloin with Garlic Herb Crust
- Incredible texture contrast: The crunchy, savoury crust gives way to the most tender, juicy meat – a wonderful combination in every bite.
- Simple, everyday ingredients: You likely have most of the pantry staples on hand. No complicated shopping list required.
- Reliable, foolproof method: The oven does all the hard work. This recipe takes the guesswork out of cooking pork tenderloin, delivering consistent results every time.
- Versatile and adaptable: It pairs beautifully with a wide range of sides, from roasted vegetables to creamy mash or a fresh salad, like Mediterranean Chickpea Salad Bowls , or even a bowl of One-Pot French Onion Pasta, or even a bowl of Viral Cucumber Salad With Spicy Sesame Dressing .cuisinebite.com/mediterranean-chickpea-salad-bowls/”>Mediterranean Chickpea Salad Bowls , or even a bowl of Viral Marry Me Chicken Orzo .cuisinebite.com/viral-marry-me-chicken-orzo/”>Viral Marry Me Chicken Orzo .cuisinebite.com/viral-cucumber-salad-with-spicy-sesame-dressing/”>Viral Cucumber Salad With Spicy Sesame Dressing .cuisinebite.com/mediterranean-chickpea-salad-bowls/”>Mediterranean Chickpea Salad Bowls, or even a bowl of Viral Marry Me Chicken Orzo .cuisinebite.com/viral-marry-me-chicken-orzo/”>Viral Marry Me Chicken Orzo.
- Perfect for entertaining: It looks impressive on a platter, yet it’s so straightforward to prepare. My husband, who’s usually picky, asked for seconds!
Ingredients You’ll Need
- 2 pork tenderloins (about 500-600g total)
- 4 tablespoons olive oil
- 6 cloves garlic, finely minced
- 3 tablespoons fresh parsley, finely chopped
- 2 tablespoons fresh rosemary, finely chopped
- 1 tablespoon fresh thyme leaves
- 100g panko breadcrumbs
- 50g finely grated Parmesan cheese
- 1 teaspoon salt
- ½ teaspoon black pepper
- 1 teaspoon paprika
- ½ teaspoon onion powder
Tip: For the best flavour, use fresh herbs if you can. Dried herbs will work in a pinch, but reduce the quantity to one-third as they are more concentrated.
How to Make Crispy Baked Pork Tenderloin with Garlic Herb Crust
- Preheat and prepare: Preheat your oven to 200°C (400°F). Line a 9×13 inch baking dish with aluminium foil for easy cleanup. This step saves you a scrub later.
- Make the garlic herb crust: In a mixing bowl, combine the olive oil, minced garlic, parsley, rosemary, thyme, panko breadcrumbs, Parmesan cheese, salt, pepper, paprika, and onion powder. Stir until everything is well coated and the mixture looks like a coarse, damp, golden-green sand.
- Prepare the pork: Pat the pork tenderloins dry with kitchen paper. This is crucial – any moisture on the surface will prevent the crust from sticking and crisping up. The meat should feel dry to the touch.
- Coat the tenderloins: Using your hands, press the herb and breadcrumb mixture firmly onto all sides of each tenderloin. Don’t be shy – you want a thick, even coating. The crust should feel compact and slightly sticky as you apply it.
- Bake to perfection: Place the coated tenderloins in the prepared baking dish. Bake for 25-30 minutes. After 15 minutes, you’ll hear a gentle sizzling sound as the crust begins to brown. At the 25-minute mark, the top should be a deep golden brown and feel firm to a gentle touch. The internal temperature should reach 63°C (145°F) when checked with a meat thermometer.
- Rest before slicing: Remove the baking dish from the oven and tent it loosely with foil. Let the pork rest for 10 minutes. This is not a step to skip – the juices will redistribute throughout the meat, and you’ll see them settling as the tenderloin relaxes. The crust will stay crisp, and the meat will be wonderfully tender.
- Slice and serve: Transfer the rested tenderloin to a cutting board. Using a sharp knife, slice into medallions about 2-3 cm thick. You should see a pale, juicy interior with a crisp, golden-brown edge. Serve immediately.
Tips From My Kitchen
- Dry the pork thoroughly: This is the number one tip for achieving a crispy crust. Any surface moisture creates steam in the oven, which will soften the breadcrumb coating. Pat the tenderloins dry with kitchen paper until they feel tacky, not wet.
- Use panko breadcrumbs: Panko breadcrumbs are larger and flakier than regular breadcrumbs, which means they crisp up much better in the oven. They create a lighter, crunchier coating that stays crisp even after resting.
- Don’t skip the rest time: After the pork comes out of the oven, the internal temperature continues to rise by about 2-3°C (carryover cooking). Resting allows the juices to settle back into the meat fibres. If you slice too early, those precious juices will run out onto the board, leaving you with dry pork.
- Check the internal temperature: Ovens vary, and tenderloin thickness can differ. A meat thermometer is your best friend here. Pull the pork at 63°C (145°F) for perfectly juicy, slightly pink meat. It will rise to a safe 65°C (149°F) during resting.
- Press the crust on firmly: Don’t just sprinkle the herb mixture on top. Use your hands to press it firmly onto all sides of the meat. This ensures the crust adheres properly and doesn’t fall off during baking. You’ll feel it compacting under your fingers.
- Let the tenderloins come to room temperature: Take the pork out of the fridge 20-30 minutes before cooking. This helps it cook more evenly, preventing the outside from burning before the centre is done.
Equipment You’ll Need
- 9×13 inch baking dish
- Aluminium foil
- Mixing bowls
- Sharp knife
- Meat thermometer (recommended)
- Kitchen paper
Common Mistakes to Avoid
- Overcrowding the pan: If the tenderloins are touching each other or the sides of the dish, they will steam rather than roast. This prevents the crust from crisping up. Ensure there is at least an inch of space around each tenderloin for hot air to circulate.
- Wrong temperature: Baking at too low a temperature will dry out the meat before the crust browns. Too high, and the crust will burn while the inside remains undercooked. The sweet spot is 200°C (400°F).
- Skipping the rest time: We’ve said it before, but it’s worth repeating. Resting the pork for 10 minutes is essential for juicy meat. Cutting into it too soon will release all the juices and leave you with a dry, disappointing result.
Delicious Variations to Try
- Spicy Version: Add 1 teaspoon of red pepper flakes or cayenne pepper to the herb crust mixture. You can also serve it with a dollop of harissa or sriracha mayonnaise on the side for an extra kick.
- Vegetarian/Vegan Option: Replace the pork tenderloin with large, flat slices of firm tofu or thick cauliflower steaks. Use a vegan Parmesan alternative or nutritional yeast in the crust. Press the tofu well before coating to remove excess moisture.
- Different Protein: This crust works wonderfully on chicken breasts or turkey steaks. Adjust the cooking time accordingly – chicken breasts will take about 20-25 minutes, while thicker turkey steaks may need 25-30 minutes. For a different take on a classic, try it on a whole side of salmon for a lovely baked fish dish.
What to Serve With Crispy Baked Pork Tenderloin with Garlic Herb Crust
- Roasted baby potatoes or creamy mashed potatoes
- Steamed green beans with a squeeze of lemon
- A simple rocket and parmesan salad with a balsamic dressing
- Buttered peas and broad beans
- Roasted carrots and parsnips with honey
Frequently Asked Questions
Crispy Baked Pork Tenderloin with Garlic Herb Crust
Ingredients
Method
-
Preheat and prepare: Preheat your oven to 200°C (400°F). Line a 9×13 inch baking dish with aluminium foil for easy cleanup. This step saves you a scrub later.
-
Make the garlic herb crust: In a mixing bowl, combine the olive oil, minced garlic, parsley, rosemary, thyme, panko breadcrumbs, Parmesan cheese, salt, pepper, paprika, and onion powder. Stir until everything is well coated and the mixture looks like a coarse, damp, golden-green sand.
-
Prepare the pork: Pat the pork tenderloins dry with kitchen paper. This is crucial – any moisture on the surface will prevent the crust from sticking and crisping up. The meat should feel dry to the touch.
-
Coat the tenderloins: Using your hands, press the herb and breadcrumb mixture firmly onto all sides of each tenderloin. Don’t be shy – you want a thick, even coating. The crust should feel compact and slightly sticky as you apply it.
-
Bake to perfection: Place the coated tenderloins in the prepared baking dish. Bake for 25-30 minutes. After 15 minutes, you’ll hear a gentle sizzling sound as the crust begins to brown. At the 25-minute mark, the top should be a deep golden brown and feel firm to a gentle touch. The internal temperature should reach 63°C (145°F) when checked with a meat thermometer.
-
Rest before slicing: Remove the baking dish from the oven and tent it loosely with foil. Let the pork rest for 10 minutes. This is not a step to skip – the juices will redistribute throughout the meat, and you’ll see them settling as the tenderloin relaxes. The crust will stay crisp, and the meat will be wonderfully tender.
-
Slice and serve: Transfer the rested tenderloin to a cutting board. Using a sharp knife, slice into medallions about 2-3 cm thick. You should see a pale, juicy interior with a crisp, golden-brown edge. Serve immediately.
Notes
I do hope you give this recipe a try. It’s one of those dishes that brings a sense of achievement with very little effort. If you make it, I’d love to hear how you get on – leave a comment below and let me know how it turned out for you! For another fantastic oven-baked meal, you might also enjoy our Creamy Tuscan Chicken Recipe or these Garlic Butter Steak Bites for a different take on a quick, flavourful dinner.