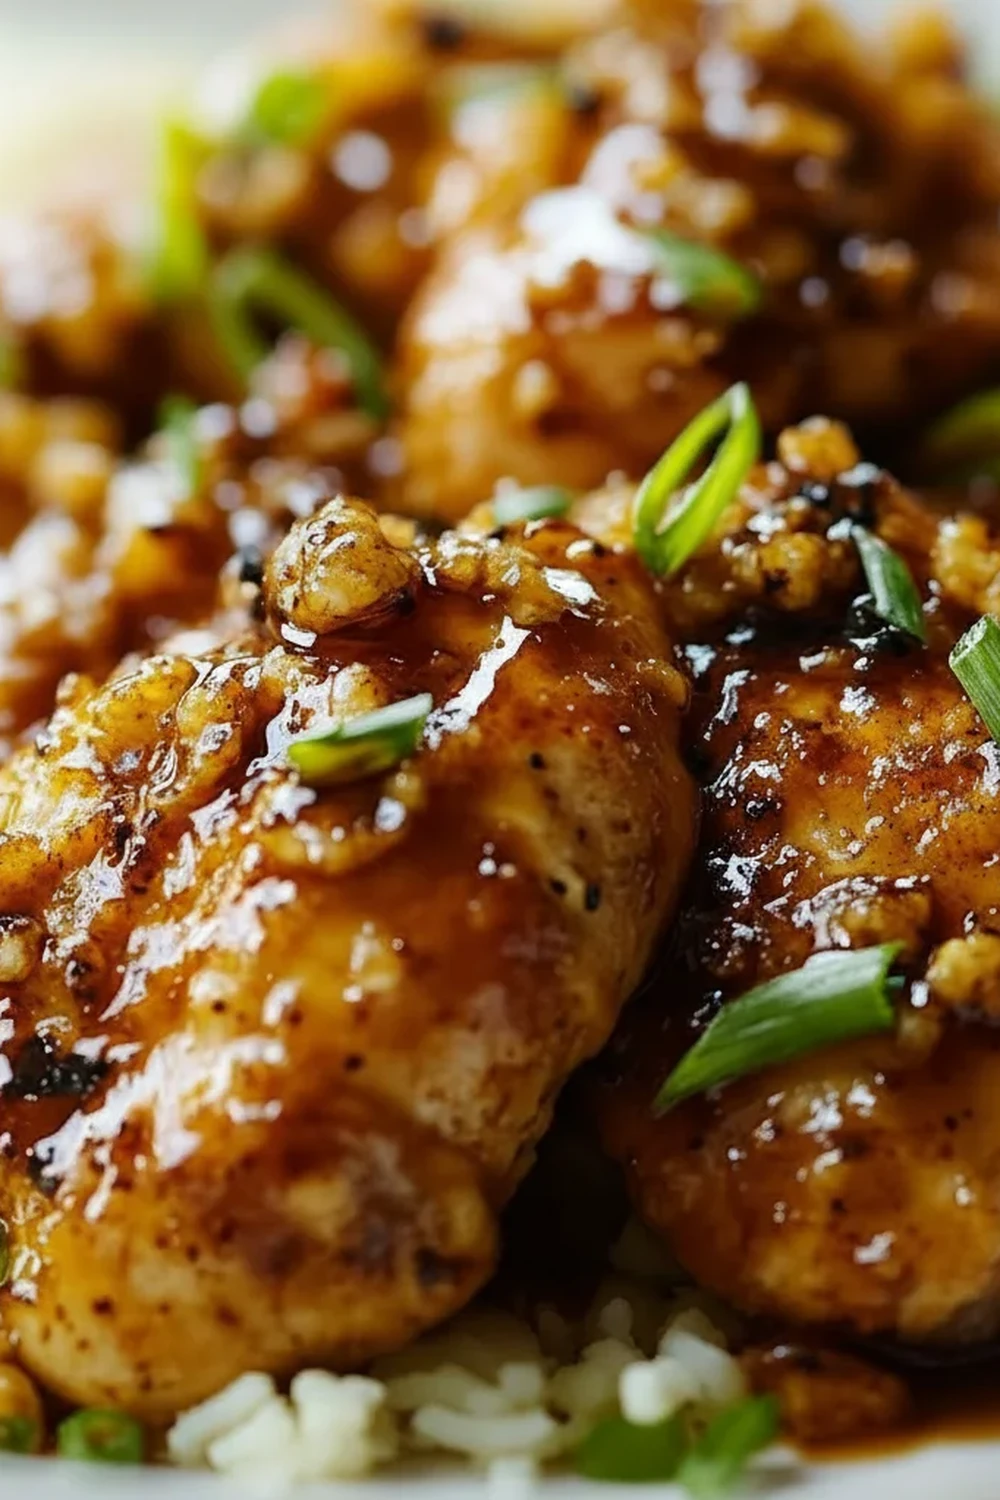
Glazed Chicken Recipe Sticky Sweet Dinner
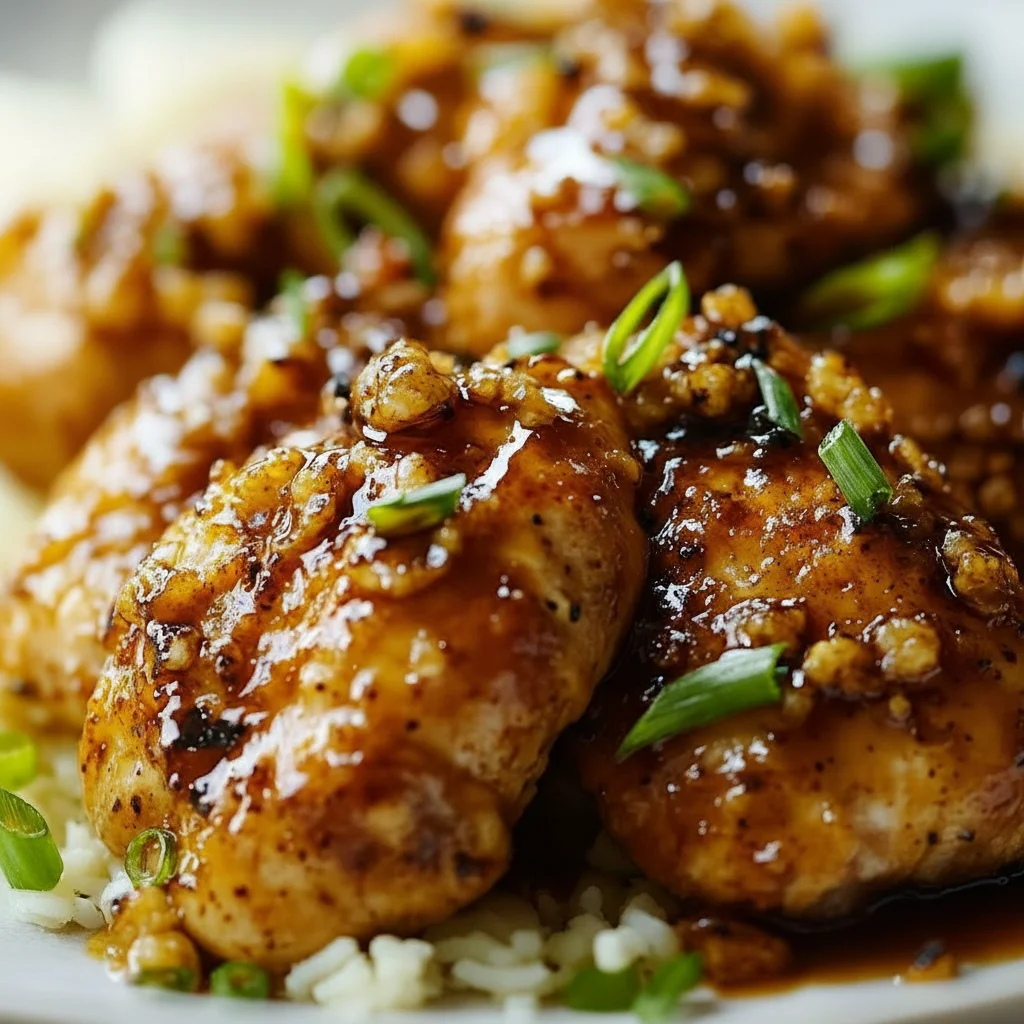
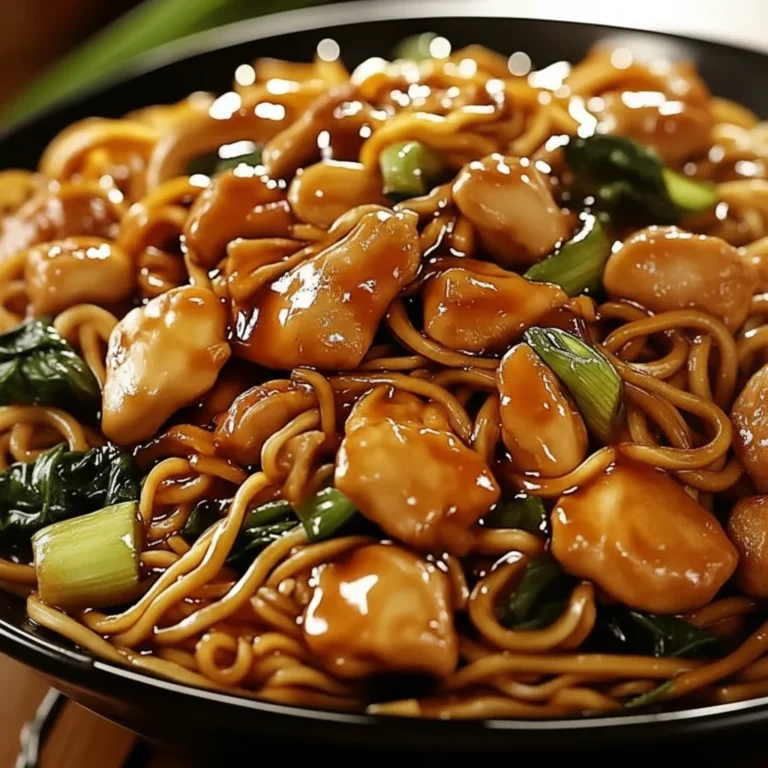
There’s a special kind of magic in a dish that looks elegant and tastes complex, yet comes together on a standard Tuesday evening. This glazed chicken recipe is precisely that. It’s the meal we turn to when we want something truly satisfying without spending hours in the kitchen. The chicken becomes incredibly tender, enveloped in a sticky, sweet, and savoury glaze that clings to every bite. My husband, who’s usually picky, asked for seconds the first time I made this! It’s the kind of chicken dinner that feels a little bit special, thanks to a glossy sauce that punches well above its weight.
What makes this glazed chicken so brilliant is the balance of flavours. We’re talking about that irresistible combination of salty soy sauce, sweet honey, sharp garlic, and warm ginger, all coming together in a perfectly thick, lacquered coating. It’s a dish that works beautifully for a family meal during the week but is also impressive enough to serve when you have friends over for a casual get-together. It’s become a firm favourite in my house, and I have a feeling it will in yours, too.
Recipe Overview
This glazed chicken recipe features tender, pan-seared chicken thighs coated in a luscious, sticky honey-soy glaze. It’s a straightforward dish where the chicken develops a beautiful caramelised crust before being tossed in a simple sauce made right in the same pan. I’ve tested this with both thighs and breasts, and for me, the thighs always win – they stay so much juicier and absorb the flavour of the glaze wonderfully.
- Prep Time: 10 minutes
- Cook Time: 20 minutes
- Total Time: 30 minutes
- Servings: 4 people
- Difficulty: Easy
Why You’ll Love This Glazed Chicken Recipe
- Genuine Flavour: The glaze isn’t just one-note sweet. It has a deep, savoury umami character from the soy sauce, a gentle warmth from the fresh ginger and garlic, and a tangy finish from a splash of rice vinegar that cuts through the richness.
- Ready in 30 Minutes: This entire chicken dinner is on the table in about 30 minutes, making it a brilliant choice for those evenings when you’re short on time but still want a proper home-cooked meal.
- Flexible Recipe: This recipe is very forgiving. If you don’t have honey, maple syrup works well as a substitute. Fancy a bit more heat? A pinch of red pepper flakes or a dash of sriracha stirred into the glaze does the trick nicely.
- Great for Any Occasion: It works beautifully for a quick family meal, but the glossy, professional-looking finish makes it smart enough to serve when you have guests for a relaxed Saturday evening.
- Family Tested: My kids absolutely devour this every time I make it. They love mopping up every last drop of the sticky sauce from their plates with fluffy rice. Everyone seems to love this one.
Ingredients You’ll Need
We’re using a handful of pantry staples to create this truly spectacular glaze. I always recommend using a good quality, low-sodium soy sauce, as it gives you more control over the final saltiness of the dish. It allows the other flavours to shine through without being overpowered.
- 8 boneless, skinless chicken thighs (approx. 800g)
- 1 tbsp vegetable or rapeseed oil
- 1 tsp sea salt
- ½ tsp black pepper
- For the Glaze:
- 4 cloves garlic, finely minced
- 1 tbsp fresh ginger, grated (about a 2cm piece)
- 80ml low-sodium soy sauce
- 60ml runny honey
- 1 tbsp rice vinegar
- 1 tsp cornflour
- 1 tbsp cold water
- For Garnish (optional):
- 1 tsp toasted sesame seeds
- 2 spring onions, thinly sliced
Marcus’s Tip: Fresh ginger makes a world of difference here. The pre-minced jarred kind is fine in a pinch, but the flavour from a freshly grated piece of ginger is so much brighter and more aromatic. It really lifts the entire sauce.
How to Make This Glazed Chicken Recipe
The process here is all about building layers of flavour in one pan. We’ll start by searing the chicken to get a lovely golden colour, and then we’ll create the glaze right in the same pan, scraping up all those delicious, caramelised bits from the bottom.
- Prepare the Chicken: Pat the chicken thighs dry with a paper towel. This is crucial for getting a good sear. Season both sides generously with the salt and black pepper.
- Sear the Chicken: Heat the oil in a large frying pan or skillet over a medium-high heat. Once the oil is shimmering, carefully place the chicken thighs in the pan, ensuring not to overcrowd it (work in batches if necessary). Cook for 5-7 minutes on the first side, without moving them, until they are deeply golden brown.
- Cook Through: Flip the chicken thighs and cook for another 5-7 minutes on the other side, or until they are cooked through. The internal temperature should reach 74°C. The Food Standards Agency (FSA) provides excellent guidance on cooking chicken safely. Once cooked, remove the chicken from the pan and set it aside on a plate.
- Sauté the Aromatics: Reduce the heat to medium. Add the minced garlic and grated ginger to the pan and cook for about 30-45 seconds, stirring constantly until fragrant. Be careful not to let the garlic burn.
- Create the Glaze: Pour the soy sauce, honey, and rice vinegar into the pan. Whisk everything together, scraping up any browned bits from the bottom of the pan. Bring the mixture to a gentle simmer.
- Thicken the Sauce: In a small bowl, mix the cornflour and cold water together to create a smooth slurry. While whisking the sauce, slowly pour in the cornflour slurry. Continue to simmer for 1-2 minutes, until the glaze has thickened enough to coat the back of a spoon. What works best for me is to keep whisking as I pour to ensure there are no lumps.
- Coat the Chicken: Return the cooked chicken thighs (and any accumulated juices from the plate) to the pan. Turn the chicken over in the glaze until each piece is thoroughly coated. Let it bubble away for another minute to allow the flavours to meld.
- Serve: Transfer the glazed chicken to a serving platter. Drizzle any remaining glaze from the pan over the top. Garnish with toasted sesame seeds and sliced spring onions before serving immediately.
Tips From My Kitchen
- Temperature Control: When you add the glaze ingredients, keep the heat at a steady medium. If the pan is too hot, the honey can catch and burn very quickly, which will give the sauce an unpleasant, bitter taste.
- The Secret Step: I learned that letting the chicken rest on a plate for a few minutes while you make the sauce makes a big difference. This brief rest allows the juices to redistribute throughout the meat, ensuring every bite is succulent and tender.
- Make-Ahead Prep: To get ahead, you can mix all the glaze ingredients (except the cornflour slurry) in a jar and store it in the fridge for up to 3 days. You can also mince the garlic and ginger ahead of time. This makes the final cooking process even faster.
- Storage: Leftovers are fantastic! Store any remaining glazed chicken in an airtight container in the refrigerator for up to 3 days. Reheat gently in a pan over a low heat with a splash of water to help loosen the glaze, or microwave until hot.
Equipment You’ll Need
- Large, non-stick frying pan or a well-seasoned cast-iron skillet
- Sharp knife and cutting board
- A couple of small mixing bowls
- Whisk
- Tongs or a spatula
Common Mistakes to Avoid
- Overcrowding the pan: It’s tempting to fit all the chicken in at once, but this will lower the pan’s temperature and cause the chicken to steam rather than sear. If your pan isn’t big enough, cook the chicken in two batches. That golden-brown crust is essential for flavour.
- Using a High Heat for the Glaze: As soon as the aromatics are in and you’re making the glaze, turn the heat down. High heat and honey are a recipe for a burnt, sticky mess. A gentle simmer is all you need to thicken the sauce perfectly.
- Skipping the Pat Dry: Don’t skip the step of patting the chicken dry with paper towels. A dry surface is absolutely key to achieving that beautiful, crisp, golden-brown sear when the chicken hits the hot pan.
Delicious Variations to Try
Once you’ve mastered the basic recipe, it’s fun to start experimenting. This glaze is a fantastic base for a few simple twists.
- Spicy Honey-Garlic Chicken: Add 1-2 teaspoons of sriracha, gochujang, or a good pinch of dried red pepper flakes to the sauce when you add the honey and soy sauce for a gentle, warming heat.
- Lemon and Herb Version: Swap the rice vinegar for fresh lemon juice and add a teaspoon of dried oregano or thyme to the glaze for a more Mediterranean feel.
- Vegetarian Option: This glaze works brilliantly with plant-based proteins. For a tasty vegetarian dinner, try it with firm, pressed tofu or tempeh. Pan-fry the tofu until golden on all sides before adding it to the finished glaze. It’s a great way to use up leftover veg, much like in our Stuffed Bell Peppers with Turkey Recipe Healthy.
What to Serve With This Glazed Chicken Recipe
This dish is wonderfully versatile, but here are a few of my favourite pairings that complement the rich glaze perfectly.
- Steamed Jasmine Rice: Simple, fluffy rice is the ideal partner here. It does a fantastic job of soaking up every last bit of that addictive, sticky glaze.
- Tenderstem Broccoli or Green Beans: Some vibrant green vegetables, either steamed or quickly stir-fried with a touch of garlic, provide a lovely, fresh crunch that cuts through the richness of the chicken.
- A Simple Cucumber Salad: A quick salad of thinly sliced cucumber, rice vinegar, and a sprinkle of sesame seeds adds a refreshing, tangy counterpoint to the meal.
Frequently Asked Questions
Glazed Chicken Recipe
Ingredients
Method
- Prepare the Chicken: Pat the chicken thighs dry with a paper towel. This is crucial for getting a good sear. Season both sides generously with the salt and black pepper.
- Sear the Chicken: Heat the oil in a large frying pan or skillet over a medium-high heat. Once the oil is shimmering, carefully place the chicken thighs in the pan, ensuring not to overcrowd it (work in batches if necessary). Cook for 5-7 minutes on the first side, without moving them, until they are deeply golden brown.
- Cook Through: Flip the chicken thighs and cook for another 5-7 minutes on the other side, or until they are cooked through. The internal temperature should reach 74°C. The Food Standards Agency (FSA) provides excellent guidance on cooking chicken safely. Once cooked, remove the chicken from the pan and set it aside on a plate.
- Sauté the Aromatics: Reduce the heat to medium. Add the minced garlic and grated ginger to the pan and cook for about 30-45 seconds, stirring constantly until fragrant. Be careful not to let the garlic burn.
- Create the Glaze: Pour the soy sauce, honey, and rice vinegar into the pan. Whisk everything together, scraping up any browned bits from the bottom of the pan. Bring the mixture to a gentle simmer.
- Thicken the Sauce: In a small bowl, mix the cornflour and cold water together to create a smooth slurry. While whisking the sauce, slowly pour in the cornflour slurry. Continue to simmer for 1-2 minutes, until the glaze has thickened enough to coat the back of a spoon. What works best for me is to keep whisking as I pour to ensure there are no lumps.
- Coat the Chicken: Return the cooked chicken thighs (and any accumulated juices from the plate) to the pan. Turn the chicken over in the glaze until each piece is thoroughly coated. Let it bubble away for another minute to allow the flavours to meld.
- Serve: Transfer the glazed chicken to a serving platter. Drizzle any remaining glaze from the pan over the top. Garnish with toasted sesame seeds and sliced spring onions before serving immediately.
Notes
I really hope you enjoy making this glazed chicken as much as we do in our house. It has become a real go-to for a reason, perfect for those nights you want big flavour without a big fuss. It’s a step up from a simple stir-fry but just as achievable, much like our popular Easy Ground Beef Tacos Recipe. Let me know how you get on in the comments below – I love hearing from you! And if you’re looking for dessert, our Lemon Crumb Bars Recipe would be a wonderful, zesty finish. Cheers, Marcus.