Oreo Dirt Cake Recipe No Bake Dessert
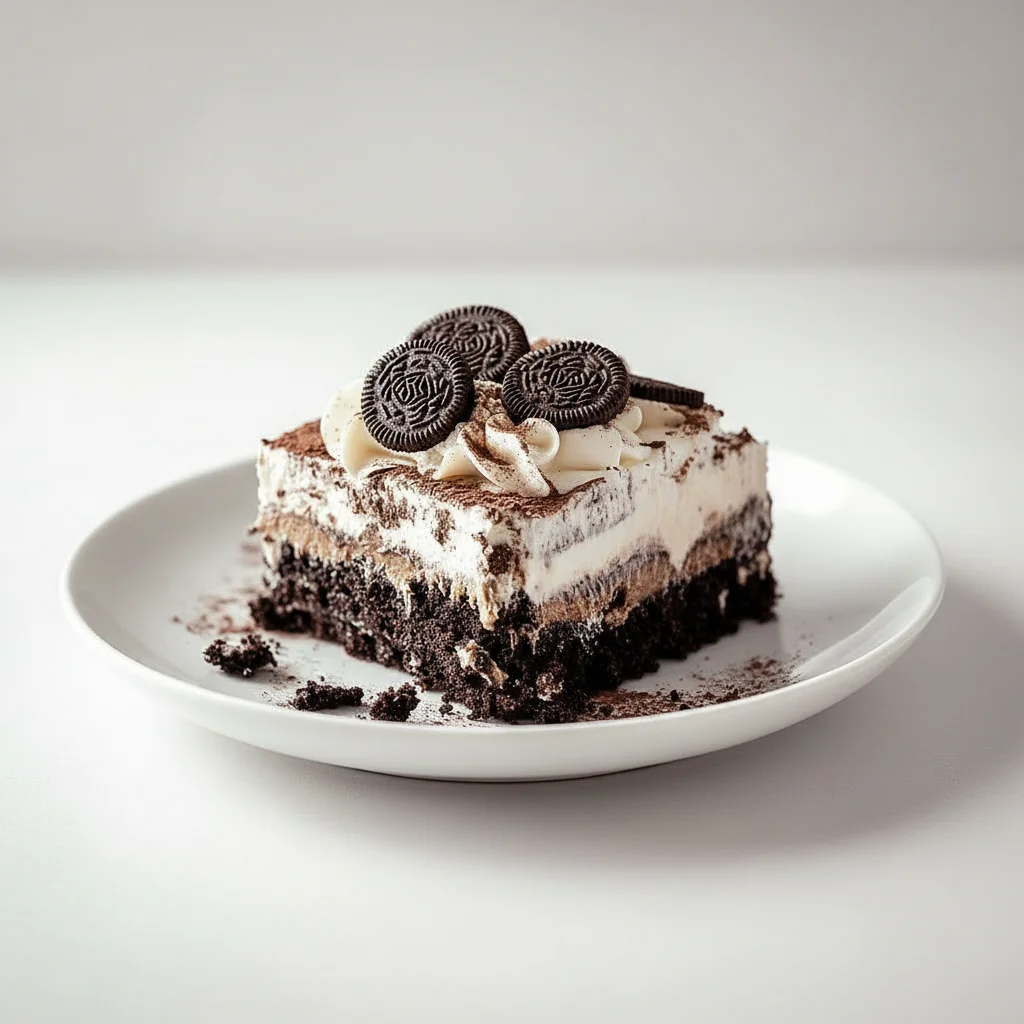
Some desserts are serious, elegant affairs that demand quiet contemplation. This Oreo Dirt Cake is not one of them. It’s pure, unadulterated fun on a spoon—a glorious mess of chocolatey ‘dirt’, creamy filling, and nostalgic joy. It reminds me of the playful desserts from my childhood, the ones that were as much about the experience as the taste. There’s something brilliant about serving your family a dish that looks like it came straight from the garden, only to see their eyes light up when they realise it’s a rich and delicious Oreo dessert.
I first made this for my nephew’s birthday party years ago, and it has been a non-negotiable request for family gatherings ever since. The magic is in the texture; you get the satisfying crunch from the crushed Oreo biscuits, which contrasts beautifully with the smooth, tangy, and wonderfully light cream cheese filling. It’s the kind of dessert that gets people talking and smiling before they’ve even taken their first bite.
This recipe is ideal for when you want a showstopper that doesn’t require you to turn on the oven. It’s a no-bake wonder that comes together with just a bit of mixing and layering, then the fridge takes over. It’s a fantastic recipe for getting children involved in the kitchen, as they absolutely love bashing the biscuits and creating the ‘dirt’ layers. Let’s get our hands dirty, shall we?
Recipe Overview
This Oreo Dirt Cake is a fantastic no-bake dessert featuring distinct layers of buttery, crushed Oreo ‘dirt’ and a rich, tangy cream cheese mousse that is lightened with freshly whipped cream. My first few attempts were a bit dense, but I found that folding in the whipped cream separately makes the filling incredibly light and airy. It’s served chilled, making it a wonderfully refreshing treat.
- Prep Time: 25 minutes
- Cook Time: 0 minutes
- Chilling Time: 4 hours (minimum)
- Total Time: 4 hours 25 minutes
- Servings: 10-12 people
- Difficulty: Easy
Why You’ll Love This Oreo Dirt Cake
- Genuine Flavour: The intense, dark chocolate flavour of the Oreos is balanced by a velvety, vanilla-kissed cream cheese filling that’s sweet but not cloying. The textures are the real star—crunchy, creamy, and utterly satisfying.
- Just 25 Minutes of Prep: The active, hands-on preparation comes together in under 30 minutes. After that, you just need to let the fridge work its magic to set everything perfectly.
- Flexible Recipe: This recipe is wonderfully adaptable. You can serve it in a large trifle bowl, a glass baking dish, or in individual clear pots for parties. Try using different Oreo flavours like mint or peanut butter for a fun twist.
- Great for Celebrations: It works beautifully for children’s birthday parties (gummy worms are a must!), summer BBQs, or even as a surprisingly fun Halloween dessert. Everyone seems to love this.
- Family Tested: My kids adore getting involved, especially with crushing the biscuits and layering the ‘dirt’. It’s a reliable recipe that always gets compliments, much like our family-favourite Giant Skillet Cookie Recipe.

Ingredients You’ll Need
For this Oreo dessert, we’re using simple, high-quality ingredients. The key to a perfect texture is using full-fat dairy. I always use Philadelphia Full Fat Cream Cheese; its firm texture ensures the filling sets properly and isn’t watery, which can happen with lower-fat versions.
- 450g Oreo biscuits (about 3 standard packs)
- 115g unsalted butter, melted
- 225g full-fat cream cheese, at room temperature
- 100g icing sugar, sifted
- 1 tsp vanilla extract
- 300ml double cream, cold
- Gummy worms or fresh berries, for decorating (optional)
Marcus’s Tip: Make sure your double cream is very cold, straight from the fridge. Cold cream whips up much faster and creates a more stable, voluminous texture, which is essential for the light mousse filling.
How to Make Oreo Dirt Cake
The process is all about creating two main components—the Oreo ‘dirt’ and the creamy filling—and then layering them together. It’s a straightforward assembly job that yields spectacular results.
- Create the ‘Dirt’: Place the Oreo biscuits (the entire biscuit, cream filling and all) into a food processor and pulse until they resemble fine crumbs, like soil. If you don’t have a food processor, place them in a sturdy zip-top bag and crush them with a rolling pin.
- Make the Buttery Base Layer: Scoop out about one cup (around 100g) of the plain Oreo crumbs and set aside for the topping later. Add the melted butter to the remaining crumbs in the food processor (or a bowl) and pulse or stir until the mixture resembles damp sand.
- Form the Base: Press this buttery crumb mixture firmly and evenly into the bottom of a 2.5-litre trifle bowl or a 20×20 cm glass baking dish. Place it in the fridge to firm up while you prepare the filling.
- Prepare the Cream Cheese Mixture: In a large bowl, using a stand mixer or an electric hand mixer, beat the room-temperature cream cheese until it’s completely smooth and free of lumps. Add the sifted icing sugar and vanilla extract and beat again on medium speed for 1-2 minutes until light and fluffy.
- Whip the Cream: In a separate, clean bowl, whip the cold double cream until it holds stiff peaks. Be careful not to over-whip it, or it will become grainy. A great guide on achieving the perfect consistency can be found on Serious Eats.
- Combine the Fillings: Gently fold the whipped cream into the cream cheese mixture using a spatula. Do this in two or three additions to keep the mixture light and airy. Stop folding as soon as it’s combined to avoid deflating the cream.
- Assemble the Layers: Remove the base from the fridge. Spread the cream cheese mixture evenly over the Oreo crust.
- Add the Final Topping: Sprinkle the reserved plain Oreo crumbs evenly over the cream cheese layer to create the final ‘dirt’ topping.
- Chill Thoroughly: Cover the dish with cling film and refrigerate for at least 4 hours, or preferably overnight. This step is crucial for the flavours to meld and for the filling to set completely.
- Decorate and Serve: Just before serving, decorate with gummy worms poking out of the ‘dirt’ or some fresh raspberries. Serve chilled, directly from the dish.
Tips From My Kitchen
- Temperature is Key: Your cream cheese absolutely *must* be at room temperature. Take it out of the fridge at least an hour before you start. Cold cream cheese will result in a lumpy filling, no matter how much you beat it.
- The Secret to a Light Filling: I used to struggle with a dense filling until I discovered this technique: whipping the double cream separately to stiff peaks *before* gently folding it in. This incorporates air and creates a stable, gloriously light mousse-like texture that makes all the difference.
- Make It Ahead: This dessert is designed to be made ahead. It needs a minimum of 4 hours to chill, but it’s even better if left overnight. This makes it a stress-free option for parties and gatherings.
- Storage: Cover the dish tightly with cling film and store it in the fridge. It will keep well for up to 3 days. The Oreo base will soften slightly over time, but it remains just as delicious.
Equipment You’ll Need
You don’t need any highly specialised equipment for this no-bake recipe, but a few items will make the process much smoother.
- Food processor (or a zip-top bag and rolling pin)
- Stand mixer or an electric hand mixer
- Large mixing bowls
- A 2.5-litre trifle bowl or a 20x20cm (8×8 inch) glass dish
- Spatula for folding and spreading
Delicious Variations to Try
Once you’ve mastered the classic, this Oreo Dirt Cake is brilliant for experimenting with. It’s a forgiving base for other flavours, much like our versatile Lemon Crumb Bars Recipe.
- Peanut Butter Twist: Add 3 tablespoons of smooth peanut butter to the cream cheese mixture and use peanut butter-filled Oreos for an extra nutty flavour.
- Mint Chocolate ‘Dirt’: Use Mint Oreos instead of the classic variety and add 1/4 teaspoon of peppermint extract to the cream filling for a refreshing twist.
- A Boozy Version (for adults): Add a splash (about 30ml) of Baileys Irish Cream or Kahlúa to the cream cheese mixture for a sophisticated, grown-up dessert.
What to Serve With Oreo Dirt Cake
This Oreo dessert is wonderfully rich and satisfying on its own, but a few simple additions can complement it nicely.
- Fresh Berries: A handful of sharp, fresh raspberries or sliced strawberries on the side provides a lovely acidic contrast that cuts through the creaminess of the filling.
- A Simple Drink: Nothing pairs better than a tall, cold glass of milk. For adults, a simple black coffee or an Americano works wonderfully to balance the sweetness.
–Gummy Worms: It wouldn’t truly be a ‘dirt’ cake without them! Poke them into the top layer just before serving so they look like they’re crawling out of the soil.
Frequently Asked Questions
Oreo Dirt Cake
Ingredients
Method
- Create the 'Dirt': Place the Oreo biscuits (the entire biscuit, cream filling and all) into a food processor and pulse until they resemble fine crumbs, like soil. If you don't have a food processor, place them in a sturdy zip-top bag and crush them with a rolling pin.
- Make the Buttery Base Layer: Scoop out about one cup (around 100g) of the plain Oreo crumbs and set aside for the topping later. Add the melted butter to the remaining crumbs in the food processor (or a bowl) and pulse or stir until the mixture resembles damp sand.
- Form the Base: Press this buttery crumb mixture firmly and evenly into the bottom of a 2.5-litre trifle bowl or a 20x20 cm glass baking dish. Place it in the fridge to firm up while you prepare the filling.
- Prepare the Cream Cheese Mixture: In a large bowl, using a stand mixer or an electric hand mixer, beat the room-temperature cream cheese until it's completely smooth and free of lumps. Add the sifted icing sugar and vanilla extract and beat again on medium speed for 1-2 minutes until light and fluffy.
- Whip the Cream: In a separate, clean bowl, whip the cold double cream until it holds stiff peaks. Be careful not to over-whip it, or it will become grainy. A great guide on achieving the perfect consistency can be found on Serious Eats.
- Combine the Fillings: Gently fold the whipped cream into the cream cheese mixture using a spatula. Do this in two or three additions to keep the mixture light and airy. Stop folding as soon as it's combined to avoid deflating the cream.
- Assemble the Layers: Remove the base from the fridge. Spread the cream cheese mixture evenly over the Oreo crust.
- Add the Final Topping: Sprinkle the reserved plain Oreo crumbs evenly over the cream cheese layer to create the final 'dirt' topping.
- Chill Thoroughly: Cover the dish with cling film and refrigerate for at least 4 hours, or preferably overnight. This step is crucial for the flavours to meld and for the filling to set completely.
- Decorate and Serve: Just before serving, decorate with gummy worms poking out of the 'dirt' or some fresh raspberries. Serve chilled, directly from the dish.
Notes
This Oreo Dirt Cake is a dessert that doesn’t take itself too seriously, and that’s precisely why we love it. It’s about bringing a bit of fun back to the table and creating a treat that everyone, from kids to grandparents, will enjoy. I hope you have as much fun making (and eating) it as my family and I do. Let me know how yours turns out in the comments below!
Happy cooking,
Marcus