How to Plate Food Like a Restaurant Chef
Restaurant food looks different from home cooking for reasons that have nothing to do with secret ingredients. It comes down to a handful of repeatable techniques: controlled portions, deliberate height, clean plate rims, contrasting colors, and sauces applied with intention rather than poured from a ladle. The good news is that every one of these skills can be learned in an ordinary home kitchen with tools you probably already own. This guide walks through the full plating process — from choosing the right plate to finishing touches — with precise quantities, timings, and substitutions so you can practice each element tonight.
Why Restaurant Plating Works: The Four Principles
Before touching a plate, understand what professional cooks are actually doing. Nearly every restaurant plate succeeds because of four principles working together:
1. Portion control. Restaurant plates leave negative space — usually 30 to 40 percent of the plate surface stays empty. Food piled to the rim reads as “home cooking,” not “chef cooking.” A useful starting point: 4 to 6 ounces (115–170 g) of protein, 3 to 4 ounces (85–115 g) of starch, and 2 to 3 ounces (55–85 g) of vegetables per main course plate.
2. Height and layering. Flat food looks flat. Chefs stack, lean, and nestle components so the eye travels upward. A 1-inch (2.5 cm) difference in height between the base and the tallest element is enough to transform a plate.
3. Color contrast. A plate should contain at least three distinct colors. Beige chicken on white rice on a white plate is the classic plating failure. A green herb oil, a few pickled red onions, or a scatter of microgreens solves it in seconds.
4. Clean edges. The rim of the plate is a frame. Any smear, fingerprint, or stray crumb on it distracts from the food. Chefs wipe rims with a damp cloth immediately before service — you should too.
Equipment You Actually Need
You do not need a squeeze bottle collection or a blowtorch. This short list covers 95 percent of home plating situations:
- Round-nose pliers or tweezers (12-inch / 30 cm kitchen tweezers are ideal; long chopsticks work as a substitute)
- Small offset spatula (4-inch / 10 cm blade) for smearing purées and lifting delicate items
- Two squeeze bottles (8-ounce / 240 ml) — one for sauces, one for oils
- Fine-mesh strainer for dusting cocoa, paprika, or powdered sugar
- Clean kitchen towels and a small bowl of hot water for wiping rims
- Plates at room temperature or warmed — cold plates dull hot food within 90 seconds
- Ring molds (2.5-inch / 6 cm diameter) for building cylinders of rice, grains, or mash
Choose plates with wide rims and matte or low-gloss finishes. White plates are the safest canvas; dark slate or charcoal plates make bright sauces and pale foods pop. Avoid busy patterns — they compete with the food.
Step-by-Step: Building a Restaurant-Quality Plate
This sequence applies to almost any main course. Follow it in order and the plate will look composed rather than assembled.
- Warm or chill the plate. Hot food goes on warmed plates (place in a 150°F / 65°C oven for 5 minutes). Cold desserts and salads go on chilled plates (10 minutes in the freezer).
- Place the sauce first. Spoon 2 tablespoons (30 ml) of sauce slightly off-center, then drag the back of a spoon through it in one confident stroke, or pipe 3 to 5 dots with a squeeze bottle. Never pour sauce over the top of the entire plate.
- Anchor the starch. Set the starch — rice, mash, polenta, or grains — just left or right of center. Use a 2.5-inch ring mold for a clean cylinder, pressing gently with the back of a spoon, then lifting straight up.
- Lean the protein. Place the protein so it overlaps the starch by about one-third and leans against it at a slight angle. This creates height. Pat the protein dry first so no juices bleed onto the plate.
- Nestle the vegetables. Tuck vegetables into the gap between protein and starch, letting a few pieces fall naturally onto the plate. Group them — do not scatter randomly.
- Add a second sauce or garnish sauce. Drizzle 1 teaspoon (5 ml) of a contrasting sauce — herb oil, balsamic reduction, yogurt — over the protein only, not the whole plate.
- Finish with texture and height. Add 1 tablespoon (about 5 g) of something crisp: toasted breadcrumbs, fried shallots, crushed nuts, or a tuile. Place the tallest garnish last, standing upright.
- Wipe the rim. Damp cloth, one pass around the entire rim. Check for fingerprints on the underside edge too.
- Serve immediately. A composed plate holds its looks for roughly 3 to 4 minutes. Have diners seated before you plate.
Precise Recipes for Plating Components
These three components give you the sauce work, the crunch, and the color that restaurant plates rely on. Each makes enough for 4 plates.
Herb Oil (for drizzling and dotting)
Makes: ½ cup (120 ml) | Prep: 5 minutes | Cook: 2 minutes
- 1 cup (20 g) packed fresh parsley or basil leaves, stems removed
- ½ cup (120 ml) neutral oil such as grapeseed or canola
- ¼ teaspoon (1.5 g) fine sea salt
Method: Bring a small pot of water to a boil. Blanch the herbs for 15 seconds, then transfer immediately to a bowl of ice water for 1 minute. Squeeze dry in a clean towel. Blend herbs, oil, and salt on high for 60 seconds until smooth. Strain through a fine-mesh strainer lined with cheesecloth, pressing gently. Do not force the solids through or the oil will turn cloudy. Transfer to a squeeze bottle. Substitution: use 2 tablespoons (10 g) dried parsley steeped in warm oil for 10 minutes, though color will be duller. Storage: refrigerate up to 5 days; the oil may solidify — run the bottle under warm water for 30 seconds before use.
Toasted Panko Crumb Topping
Makes: ¾ cup (45 g) | Prep: 2 minutes | Cook: 4 minutes
- ¾ cup (45 g) panko breadcrumbs
- 1 tablespoon (15 ml) olive oil
- ¼ teaspoon (0.7 g) garlic powder
- Pinch of fine sea salt
Method: Heat a dry skillet over medium heat for 1 minute. Add oil, then panko, garlic powder, and salt. Toast, stirring constantly, for 3 to 4 minutes until deep golden brown. Spread on a plate to cool — they crisp as they cool. Substitution: crushed cornflakes or crushed crackers work identically. Storage: airtight container at room temperature for up to 1 week.
Quick Pickled Red Onions (for color contrast)
Makes: 1 cup (150 g) | Prep: 5 minutes | Cook: 1 minute | Pickle time: 20 minutes minimum
- 1 small red onion (about 6 ounces / 170 g), thinly sliced
- ½ cup (120 ml) apple cider vinegar
- ½ cup (120 ml) water
- 1 tablespoon (12 g) granulated sugar
- 1 teaspoon (6 g) fine sea salt
Method: Pack onion slices into a 12-ounce (350 ml) jar. Bring vinegar, water, sugar, and salt to a boil, stirring until dissolved. Pour hot brine over onions, press down, and cool at room temperature for 20 minutes. Substitution: white vinegar plus 1 teaspoon (4 g) honey. Storage: refrigerated in the brine for up to 3 weeks.
Plating Specific Courses
Main Courses
Use a 10- to 11-inch (25–28 cm) plate. Build your cylinder of starch off-center, lean the protein against it, and keep the tallest element at the back of the plate (from the diner’s view) so it does not block the rest. Sauce goes under and beside — never on top of a crusted protein, which softens the crust. If you want to explore more foundational recipes to practice with, the Cuisinebite blog has plenty of approachable dishes to test your skills on.
Desserts
Dessert plating rewards restraint. Use a smaller plate (7–8 inches / 18–20 cm). One sauce, one crunch, one fresh element. A smear of sauce with the back of a spoon, a slice of cake or a bar leaning against a quenelle of cream, and three berries — odd numbers always look more natural than even ones. For a dessert that plates beautifully with minimal effort, try the lemon crumb bars recipe: cut into 2-by-3-inch (5 by 7.5 cm) rectangles, dust the top edge with powdered sugar through a fine strainer, and serve with a 1-ounce (30 g) dollop of whipped cream and a single blackberry.
Breakfast and Brunch
Brunch plates benefit from a “zone” approach: one zone for the main item, one for a fresh garnish, one for a sauce. Stack pancakes or waffles in a neat 3-high pile, place fruit in a tight cluster beside rather than on top, and pour 2 tablespoons (30 ml) of syrup in a pool at the base rather than over the stack. A large-format dish like sheet pan pancakes can be cut into clean 3-inch (7.5 cm) squares and plated individually with a dusting of sugar and a few berries for a polished, portioned look.
Practical Tips That Make the Biggest Difference
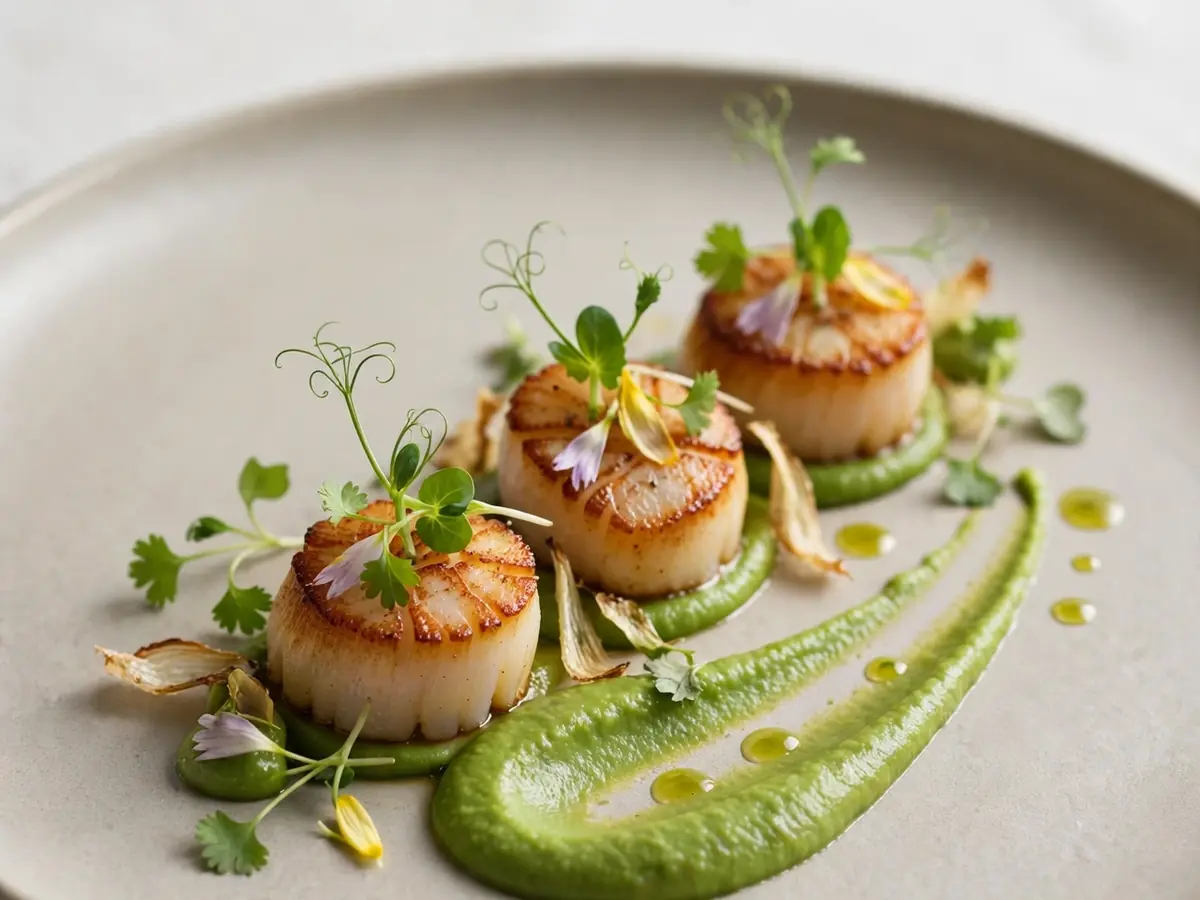
- Odd numbers rule. Three scallops, five berries, seven croutons — odd counts read as intentional.
- Use negative space deliberately. Leave one-third of the plate empty and place that empty space toward the diner.
- Dry your protein. Pat cooked meat dry with paper towel before plating; surface moisture dulls color and creates puddles.
- Warm your sauce, cool your garnish. Temperature contrast is part of the experience.
- Practice on a dummy plate. Plate once, photograph it, then re-plate. Chefs do this constantly during menu development.
- Season the plate, not just the food. A tiny pinch of flaky salt on the rim-adjacent edge of a protein adds both flavor and visual texture.
- Keep garnish edible and relevant. Every element on the plate should be something the diner is meant to eat.
Common Plating Mistakes and How to Fix Them
Too much food. Reduce each component by 20 percent and see how much better the plate reads. Sauce flooding. Keep total sauce to 2 to 3 tablespoons (30–45 ml) per plate. Random scattering. Group elements into clusters of three to five pieces. Busy plate patterns. Switch to a plain white or matte dark plate. Cold plates. Warm them for 5 minutes at 150°F (65°C). Late garnishing. Add delicate garnishes — microgreens, herbs, crisps — within 60 seconds of serving.
Frequently Asked Questions
Do I need special tools to plate food like a restaurant chef?
No. Kitchen tweezers or long chopsticks, a small offset spatula, a fine-mesh strainer, a squeeze bottle, and a clean damp cloth cover nearly every technique in this guide. A 2.5-inch ring mold is helpful for building cylinders of rice or mash but can be improvised with a small bowl or a cleaned tin can with both ends removed.
How much food should go on a dinner plate?
A practical restaurant-style ratio for a main course is 4 to 6 ounces (115–170 g) of protein, 3 to 4 ounces (85–115 g) of starch, and 2 to 3 ounces (55–85 g) of vegetables, leaving roughly one-third of a 10- to 11-inch plate empty. The empty space is not wasted — it frames the food and makes the portion look generous rather than crowded.
How long does a plated dish hold its looks before serving?
About 3 to 4 minutes for a hot main course. Sauces begin to bleed, crisps soften, and hot food cools quickly once it leaves the pan. Plate only when diners are seated, and add the most delicate garnishes — herb leaves, microgreens, toasted crumbs — in the final 60 seconds.
Can I plate food ahead of time for a dinner party?
Partially. Sauces, purées, pickles, and crunchy toppings can all be prepared hours or days ahead and stored as described above. Plates can be warmed and garnishes prepped. But the final assembly — placing the protein, adding the sauce drizzle, wiping the rim — should happen just before serving, because that is the step that cannot be held without visible loss of quality.
What is the easiest way to add color to a beige or brown dish?
Keep three quick fixes on hand: a green herb oil (recipe above), quick-pickled red onions (20 minutes), and a small handful of fresh herbs or microgreens. Any one of these adds an instant color contrast against brown, tan, or cream-colored food and costs less than a minute of active work at plating time.
Should sauce go under or over the food?
Usually under and beside. A pool or smear beneath the protein keeps a crust crisp and lets the diner control how much sauce they get. Reserve a small drizzle — about 1 teaspoon (5 ml) — to go over the top of the protein for visual contrast, but never drown the plate; total sauce per serving should stay between 2 and 3 tablespoons (30–45 ml).